


ruubi
-
Content Count
94 -
Joined
-
Last visited
-
Days Won
15
Posts posted by ruubi
-
-
Client modification that allows you to automatically connect to the server
This modification allows you to specify the ip address , port , server version , username and password
First Step:
- You need to download Hex Editor:
Second Step:
- Open your Game.exe in Hex Editor:

Third Step:
- After you opened your game.exe , you need to click the search option, then replace.
-After that you gonna go to Hex values
-At the "Search For" line you put : 84 C0 74 17 8B C6 8D 50 01 EB 03 8D 49 00
-Then to 'Replace with' line you put: 84 C0 EB 17 8B C6 8D 50 01 EB 03 8D 49 00
-After that you click ok , Save the file.
Fourth Step:
- After that you go to your client folder then right click startgame.bat and click edit with notepad:
-Then you gonna replace "start system\Game.exe" with
Quotestart system\Game.exe startgame tom:127.0.0.1,1973,YOURUSERNAME,YOURPASSWORD
-After that save the changes.
Now the player will not need to enter their username and password: the game now will automatically connect to the server and the player will be directly in the character selection stage.
-
 8
8
-
Nice :)
-
-
On 1/17/2019 at 3:12 PM, saa0d said:Guys, i've been trying to communicate with Adrian since a week now but he hasn't been on at all. If anybody can mod my files/client to do the same thing in the picture or can reach Adrian out of this forum, i'd be grateful.
nice
-
If you are willing to pay DM me
-
-
-
-
-
Very nice!
-
Hello @SD13 First of all to create a chest contains +27 item you need the chest script.
Go to your serverfiles/resource/script/calculate/ItemEffect.lua
-After you will open it go in the middle of the itemeffect or everywhere and put this:
----------------------------------------------------------------------------------------------
function ItemUse_Example27( role, Item )
local GemSlotAID3 = 15 -- Gem Stone ID A ( Can be founded in stoneinfo.txt )
local GemSlotBID3 = 29 -- Gem Stone ID B ( Can be founded in stoneinfo.txt )
local GemSlotCID3 = 22 -- Gem Stone ID C ( Can be founded in stoneinfo.txt )
local GemSlotALevel3 = 9 -- Gem Level - 1 ~ 9
local GemSlotBLevel3 = 9 -- Gem Level - 1 ~ 9
local GemSlotCLevel3 = 9 -- Gem Level - 1 ~ 9
r13,r23 = MakeItem(role,equipmentid,1,18)-- Your Equip
local Equipp3 = GetChaItem(role,2,r23)
local param3 = GetItemForgeParam(Equipp3,1)
local Item_Stone3 = {}
local Item_StoneLv3 = {}param3 = TansferNum(param3)
Item_Stone3[0] = GetNum_Part2(param3)
Item_StoneLv3[0] = GetNum_Part3(param3)
Item_Stone3[0] = GemSlotAID3
Item_StoneLv3[0] = GemSlotALevel3
param3 = SetNum_Part2(param3, Item_Stone3[0])
param3 = SetNum_Part3(param3, Item_StoneLv3[0])
SetItemForgeParam(Equipp3, 1, param3)
param3= TansferNum(param3)
Item_Stone3[1] = GetNum_Part2(param3)
Item_StoneLv3[1] = GetNum_Part3(param3)
Item_Stone3[1] = GemSlotBID3
Item_StoneLv3[1] = GemSlotBLevel3
param3 = SetNum_Part4(param3, Item_Stone3[1])
param3 = SetNum_Part5(param3, Item_StoneLv3[1])
SetItemForgeParam(Equipp3, 1, param3)param3 = TansferNum(param3)
Item_Stone3[2] = GetNum_Part2(param3)
Item_StoneLv3[2] = GetNum_Part3(param3)
Item_Stone3[2] = GemSlotCID3
Item_StoneLv3[2] = GemSlotCLevel3
param3 = SetNum_Part6(param3, Item_Stone3[2])
param3 = SetNum_Part7(param3, Item_StoneLv3[2])
SetItemForgeParam(Equipp3, 1, param3)local Socket3 = GetItemForgeParam(Equipp3, 1)
Socket3 = TansferNum(Socket3)
Socket3 = SetNum_Part1(Socket3, 3)
SetItemForgeParam(Equipp3, 1, Socket3)
RefreshCha(role)
end---------------------------------------------------------------------------------------------------
After you do this you need create your own chest iteminfo line:
Go in your serverfiles/resource/iteminfo.txt
And Put this in your iteminfo:
XXXX +27 Item Chest n1257 10130023 0 0 0 0 0 00 41 0 0 0 0 0 1 1 1 1 99 0 180 -1 0 -1 0 0 -1 -1 0 0,0 0,0 0,0 0,0 0,0 0,0 0,0 0,0 0,0 0,0 0,0 0,0 0,0 0,0 0,0 0,0 0,0 0,0 0,0 0,0 0,0 0,0 0,0 0,0 0,0 0,0 0,0 0,0 0,0 0,0 0,0 0,0 0,0 0,0 0,0 0,0 0,0 0,0 0,0 0,0 0,0 0,0 0,0 0 0,0 0,0 0 0 0 0 0 0 0 0 0 ItemUse_Example27 0 0 0 0 0 0 Contain +27 Item
-After Compile your iteminfo.txt ( you can find compiler in mega archive to "Tools" Section : https://mega.nz/#F!OUMUgTYb!jtCsqh7halK_O9uzWyaG0g!DAFTSaQQ , ignore the errors when u compile it)
-After you compiled it put ur iteminfo.bin to clientfolder/scripts/table
And it will work.
Hope you will understand.
Thanks.
-
1
-
-
@BlackBarba The files are released in the mega.nz archive
Link to archive: https://mega.nz/#F!OUMUgTYb!jtCsqh7halK_O9uzWyaG0g!bNEwAYjL (Zero FilesPrv)
-
1
-
-
Hi @SD13 you tried compile your iteminfo.txt to iteminfo.bin and after put in clientfolder/scripts/table ?
-
Hello @SD13 Why you don't check mega.nz archive? there are alot of files with the things you want.
Mega archive link : https://mega.nz/#F!OUMUgTYb!jtCsqh7halK_O9uzWyaG0g!7c9UWbhJ
-
No problem , Have a good day!
-
Hello @pacas96 try add any record to table 'Account' in database 'GameDB', for example create a gm account.
-
I have the same problem , someone know how to fix?
-
your map folder in minimap is missing.
-
the same problem appears at me .. someone know to fix?
-
Maybe because he is kind?
-
-
I sended you a message on private.
-
Fixed!
-
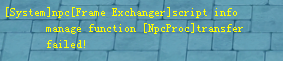
Hello!, i added this npc exchanger, when i click browse it shows me that:
Can Somenone help me with this problem!
Thanks!


ItemInfo Cache
in Questions & Help
Posted · Report reply
Just give up , no one will help you if you are not willing to pay